WR Sport Performance Package |
Genuine Accessories #44S/Q5/025 Installation Instructions |
Fig. 2 - Prodrive
ECU: |
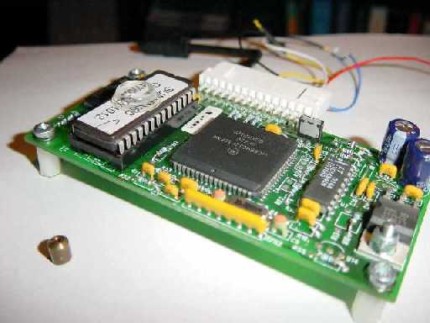
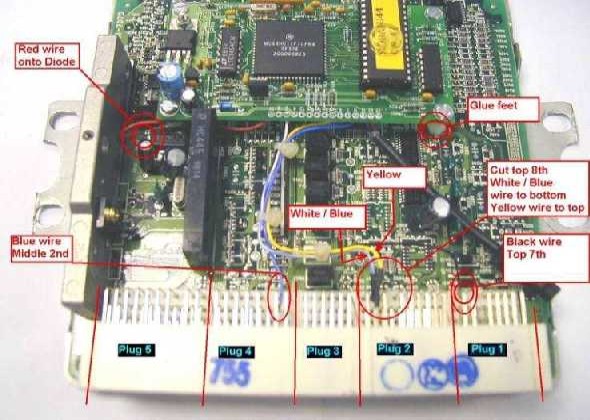
Fig. 3 - Factory ECU with Prodrive
ECU attached: |
Fitting procedure: Attachment of Prodrive ECU to Factory ECU 1. Remove the factory E.C.U. from the car. 2. Take off the top cover of the unit and gentle push the items shown in Fig.1 back to give access for the Prodrive E.C.U. (Fig. 2) 3. Cut the red wire on the Prodrive E.C.U. to approximately 75mm long and strip the end ready for soldering. 4. Using a sharp pick scratch away the varnish protective cover from the + positive supply to the diode, and then solder on the red wire. (Fig. 3) 5. Position the Prodrive E.C.U. onto the factory board and glue the feet down with a silicon type glue, please note exact position from Fig. 3. 6. Cut the blue wire on the Prodrive E.C.U. to approximately 90mm long and strip the end ready for soldering. 7. Solder the blue wire to the 2nd middle leg in plug 4. (Fig. 3) 8. Cut the white/blue (or white) wire on the Prodrive E.C.U. to approximately 90mm long and strip the end ready for soldering. 9. Cut the 8th top leg in plug 2 and then solder the white/blue (or white) wire from the Prodrive E.C.U. onto the bottom end of the cut leg. (Fig. 3) 10. Cut the yellow wire on the Prodrive E.C.U. to approximately 110mm long and strip the end ready for soldering. 11. Solder the yellow wire from the Prodrive E.C.U. onto the top end of the cut leg. (Fig. 3) 12. Cut the black wire on the Prodrive E.C.U. to approximately 130mm long and strip the end ready for soldering. 13. Solder the black wire from the Prodrive E.C.U. onto the 7th top leg in plug 1. (Fig. 3) 14. Cable tie the wires from the Prodrive E.C.U. together as shown in Fig. 3. 15. Replace the cover to the factory E.C.U. and attach the labels to the bottom surface to seal the unit. 16. Refit to car. |
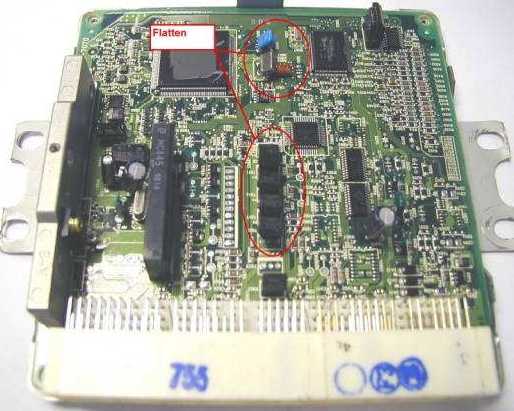
Fig. 1 - Standard Factory ECU: |